The Ultimate Guide On How To EQ Drums
- drumaudioediting
- Sep 9, 2019
- 7 min read
Updated: Sep 24, 2020
Equalisation is arguably the most important tool in your DAW for shaping the sound of your drums, post recording. It's so important to know the basic ins and outs of EQ and what frequency bands to look out for. Don't be one of them people that just try and 'wing it'.
Whether you're not 100% confident on using EQ or just looking to improve your knowledge then I've created this guide just for you. There are so many people in videos/articles telling you what you should cut and boost etc; do they realise that recording drums is a creative art, NOT something you follow by a manual?
I'm not here to tell you exactly what to do or give you a magic one-size-fits-all frequency you MUST cut/boost because that simply doesn't exist. This GUIDE is here to do just that, educate you enough to start playing with your EQ more and become better at using one. That being said, let's get stuck in shall we?
There are two purposes only to use EQ on your drums and that is to get rid of (cut) unwanted frequencies or create more (boost) frequencies that will enhance the sound.
The reasons for either cutting or boosting frequencies boils down to many things; as a session drummer recording deliverables though, your main tasks with EQ will be to shape the timbre of the drums and remove unwanted frequency content. This is to produce a professional, clean sound that suits the genre you're working with.
If you're providing drum recordings for a client, it's important you don't go overboard with the EQ. Deliver good sounding tracks that the client has plenty of spectral content to play about with when it comes to mixing the song down. In other words don't go cutting loads of frequencies when the mixing engineer may actually want them in the mix.
Alternatively, if you're mixing your own song, cover or are just playing around with your EQ on a personal recording; go wild, experiment and use your ears to discover the certain target frequencies you like and don't like with the help of this blogpost.
I was always taught where possible to avoid boosting frequencies and when you do, don't over do it. The thing is you're creating more of something that wasn't originally there which is going to sound more unnatural. This may or may not be an issue for you depending on your personal views and the genres/artists you work with.
The human hearing range is there or thereabouts between 20Hz and 20kHz, which is the range you will see in almost all EQ plugins. You are usually given a number of bands (eg. 1-band, 3-band, 7-band) which is the number of separate controls you have over the frequency spectrum on that given plug-in.
There are 3 kinds of controls/filters you need to know about in your EQ; pass, shelving and parametric. These are detailed below:
Pass Filters
Pass filters are a very simple EQ method where you block (cut out) all low or high frequencies to one side of a set cut-off frequency. You can sometimes control the angle of the 'slope' of this cutoff which determines how gently (or not) the filter comes into effect.
Low Pass Filter: An EQ curve that only lets through low frequencies and cuts all frequencies above where it is set. You could use a low pass filter on a kick drum to get rid of any unnecessary high frequencies.
High Pass Filter: An EQ curve that only lets through high frequencies and cuts all frequencies below where it is set. You would tend to use a HPF on all your channels/tracks to cut out any rumble, floor noise and unwanted low end frequencies.
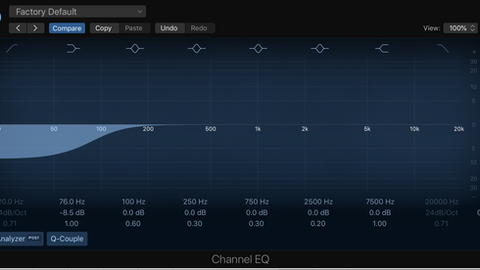
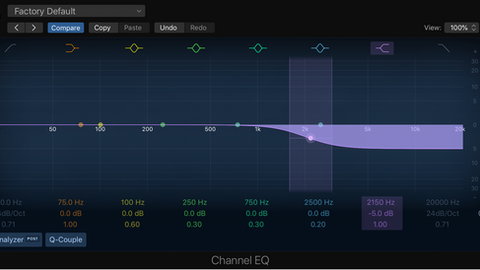
Low Pass Filter (Left/Top), High Pass Filter (Right/Bottom)
Shelving Filters
Shelving filters are what you will be commonly using on speaker systems while controlling bass and treble settings. This type of EQ control gives you very limited 'fine-tuning' and involves cutting or boosting large bands of frequencies at a time. This does have some useful applications, though.
Rather than explaining what each type of shelving filter does, here's some screenshots below that will visually explain what each one does without me waffling on.
Low Shelving Cut (Top Left/First), Low Shelving Boost (Top Right/Second), High Shelving Cut (Bottom Left/Third), High Shelving Boost (Bottom Right/Fourth).
Parametric Filters
These filters are commonly given to you in most graphic EQ plugins and are what allows us to get into the nitty-gritty and fine tune specific frequencies. You can control the bandwidth (frequency range) to focus on a more narrow (or broad) section of frequencies. This setting is often called the 'Q'.

Which Frequencies Do I Cut/Boost?
Now we have covered the basics, let's get into some target frequencies for each track of your kit.
Kick Drum
Generally, you want a kick to have plenty of power and impact which you can achieve with plenty of content around 90-120Hz. Anything below that can be described as more of a 'thud' and can create more 'fatness'.
It's good practice to add a HPF (high pass filter) to get rid of unnecessary boominess and therefore give it more clarity. I usually place this at around 70-80Hz but this entirely depends on the genre and how much low end content you want to keep.
'Boxiness' tends to be a common issue and gives your kick a really cheap sound, almost like the sound of smacking a cardboard box (hence the name). If you aim to cut with a parametric filter at around 500Hz, you will immediately begin to notice an improvement in sound.
This reduces unwanted low-mids, making the low end impact and the high end presence more noticeable, therefore making it sound much cleaner and professional. You can use 500Hz as a starting point, then hover around there and use your ears to target the right zone for your recording.
Boosting very narrowly (Higher Q) around 4-8kHz will produce more of the click-y sound heard in heavier rock and metal genres. Even a small boost here will give your kick much more presence in a full mix and surprisingly makes your kick stand out more than boosting the low end.
All frequencies above these prove pretty useless and are often just a hissing sound. Rolling off the highs with a LPF could go unnoticed and provide more space for cymbals.
Snare Drum
Every Drummer wants a cracking sounding snare on their recordings. Your snare might not have that big, full sound you desire pre-recording, however 120-300Hz is the range you want to be boosting to add fullness and body. Anything below 100Hz can be cut off with a HPF to remove noise.
I personally find just over 200Hz is my sweet spot, you can use this as a guide to find yours which depends on the tuning of your snare. Be sure to boost a narrow bandwidth of frequencies to avoid making the snare too overpowering.
Boosting between 500Hz-1Khz can give a really cool 'wooden' sound that is very recognisable in certain genres. It's more of a 'clunk', like a toy snare opposed to the fatness of the skin of the drum. It's one of them things you will need to listen to for yourself to really understand what I mean.
The 2-10KHz range is crucial for your snare timbre. Boosting around this area with a parametric filter will provide more crispness, presence and 'snap'. Cutting can give the illusion that the snare is more distant and make it sound 'softer'. You could either cut or boost here with a parametric or shelf boost filter. Whatever sounds best to your ears.
Toms
Toms, especially floor toms can easily get out of control unless we clean up the low end. And so it usually makes sense to add a HPF at around 50-100Hz to cut some, if not all of the 'rumble' out.
Target frequencies are going to vary depending on the tom and it's tuning, however boosting anywhere in the region of 80-500Hz will add some extra fullness and 'thud', improving the sound of a flat tom recording.
Toms are similar to kicks in the way we want a good amount of lows for a thud aswell as some presence in the high end frequencies. Everything in between is rarely needed to be touched. A gentle boost with a parametric filter between 2-5kHz will give the illusion of more attack in each hit.
A high shelf filter can be used anywhere over 5kHz to either cut or boost. Whether you cut or boost depends on if you're wanting a brighter, more present timbre or want to dull down the sound a tad.
Hi-hats The hi-hats are the most bright element of a mix that are constantly being played, most of the time. Therefore the way you choose to EQ your hi-hat can have a huge impact on the brightness of the overall mix.
A lot of the microphone bleed from the kick and snare can be minimised by adding a HPF anywhere around 100-200Hz. The higher the frequency you set your HPF to, especially over 200Hz, the more of the 'clang' you will lose. This effect can be controlled anywhere in the range of 200Hz-1kHz.
Often, hi-hat's can sound detached from the rest of the kit due to their overemphasised highs. You can 'glue' hi-hats to the kit by reducing this glare and shimmer over 8kHz, likewise you can boost this area to add more of it.
Between 1-7kHz you can add or take away the 'crispness' tone of the hats. If you are finding your hats overpowering, adding a high shelf cut of a couple of decibels from around 5kHz can dull them down and take a bit of that edge off.
Overheads
Providing you are using your overhead mics for mainly the cymbals (each drum is separately close-mic'd) your first aim is to remove as much of the drum content as possible without jeopardising the cymbal sound. This involves a HPF that can be as high as 1kHz and beyond.
I personally find setting the HPF this high takes too much away from the frequency content of the overheads, though. 500Hz is a good starting point for you to set your HPF and from there you can alter the frequency and find your own sweet spot.
If you're wanting to introduce more of the kit (snare and toms) into the recording with your overhead mics, you could set your HPF as low as 100-200Hz. You'll find at this range the majority of the muddiness is removed while still including a lot of content from the snare and toms.
Similar to the hi-hat, more shimmer can be added over 8kHz and dullness can be controlled over 5kHz. I commonly add a high shelf boost of around 1-3dB at 5kHz which drastically adds brightness and life to the overheads and full mix in general.
Summary
You now have all the knowledge you need to open up your DAW and start experimenting with EQ yourself. As I mentioned earlier there's no one-size-fits-all approach to EQ, each editing/mixing situation is different and everyone has their own personal tastes.
Use these frequencies as a rough guide and note down the frequency ranges that you find the most effective to either cut and boost to achieve your own sound. Once you find these you will then have your own references to go to when EQ-ing in the future.
Article written by Eddie at The Professional Musician Academy
►► Get more YouTube views on your drum covers. Download the FREE guide here: https://www.drumaudioediting.com/drumcoverediting


